Once you have installed and published the module to a suitable position in your template you will need to configure the settings. Please take the time to review the following information and see the documentation for your specific template for further information. Please ensure you have also installed and published the JB Library plugin .
Slideshow gives you three options for how the css and javascript files get loaded on your site:
1.Load the css and javascript files on the fly into the head of your site whenever the microblog module is loaded on the page. This option is ideal as it means you dont load the files unnecessarily but it's important to note that it will not work if you have the system cache in Joomla turned on.
2. Load the scripts in the body of the page whenever the microblog module is loaded on the page. This option will work with the cache turned on but it is not xhtml valid.
3. Load the scripts manually in your template. This option is ideal if you are using Joomla's cache although it does mean that the files load on all pages. There are ways around that and testing to see if the module has loaded plus if you are using a css or js compressor like this the cssjs compress that we use on this site then it may not be such a concern. You may also like to add the microblog css to your template's css file in order to avoid adding another http request to your page load.
The scripts required for the module if you want to use the slideshow styling are:
<link href="/docs/modules/mod_slideshow3/slideshow/slideshow.css" type="text/css" />
The files required for the slideshow javascript if you are only using the fade transition are:
<script type="text/JavaScript" src="/modules/mod_slideshow/slideshow/jquery.cycle.lite.js"></script>
Or if you are using any transition other than fade::
<script type="text/JavaScript" src="/modules/mod_slideshow/slideshow/jquery.cycle.js"></script>
The slideshow also incorporates some great looking and unique animations as a way of making your text and images fade and slide across the screen.
These settings include the time that each slide remains visible, the time it takes to transition from one slide to the next. The following list highlights the animations available for the transition effect:
The images displayed in the Slideshow v3.1 can be displayed from one of two sources - from the content item or from a folder.

1. Displaying images from the content item.
1. This is perhaps the easiest way to display images in the slideshow and basically relies on there being an image in the introduction text from the content items that you intend to display in the slideshow. Images need to be at least the size of the dimensions that you specify in the image size parameters as the resize script will not enlarge images.
2. Displaying items from a folder.
This option is slightly harder to implement but it gives you a greater range of images you can use in the slideshow - ie the benefit is that the image used in the slideshow does not also need to be in the content item.
The images displayed using this method need to have the same name as the content item minus the spaces.
As an example if the content title is "Minimal Web Design" then the image name must be MinimalWebDesign.jpg.
The main difficulty in using this technique is for languages other than English or content titles with non ordinary characters. We have some safeguards to prevent issues from occurring in non-English languages but they unfortunately do not cover all issues.
Back to top
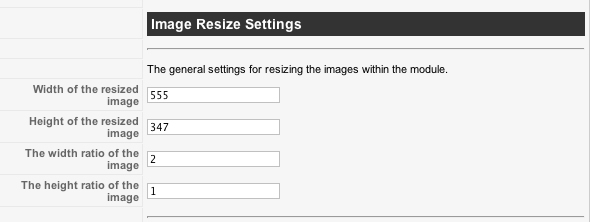
The Slideshow module utilises the php image resizer from shiftingpixel which is a flexible image resizer that crops and resizes images on the fly. While the resize options are mostly intuitive there is some need to use your maths brain when calculating appropriate crop and resize settings for your images.

From the snapshot above you can see that there are four settings that control the output of the image:
width, height, crop width and crop height.
Its important to note that the resize script can not enlarge images so if the image the script is processing is smaller than the width and height set in the parameters then the original image will be displayed.
Where are the images stored?
You can find the resized images in the modules/mod_slideshow/imagecache folder on your server. This folder needs to be writable from the Joomla user on your server for the script to function correctly.
Back to top
The slideshow is made up of three basic elements which include the slideshow image, the text and the navigation. The position and the dimensions of these elements are controlled in the module admin by using absolute positioning which means you have ultimate flexibility in creating your own layout for the content, image and navigation buttons.
To get the best use out of the slideshow you need to know the approximate width of your template so you can work with the left margin for each of the three elements. Here is a step by step of how to go about setting the dimensions of the slideshow correctly. In this description we are going to use the Strata template as a base in a 980px wide layout.

1. Set the height of the enitre module. This value determines the height of the entire slideshow block

2. Set the position for the image. The resized image width and height is controlled in other parameters.

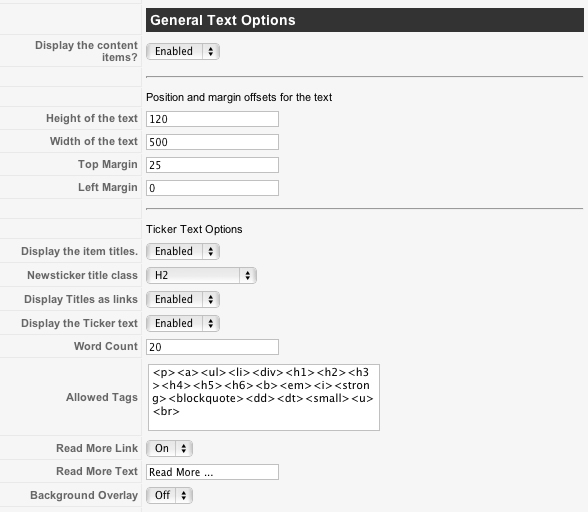
3. Set the position of the text. The height and width of the text needs to be set explicitly. The top and left margin values determine where the text is placed in the overall slideshow box.

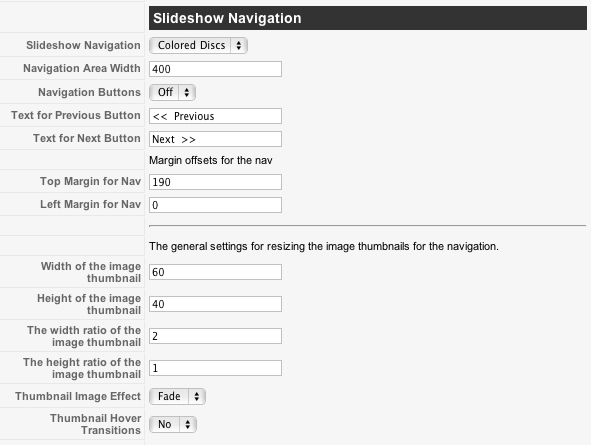
4. Set the position of the navigation.

The text in the slideshow is drawn directly from the introtext of the content items that you specify in the module parameters. It is possible to use the slideshow without display text.

While the above settings are reasonably self explanatory it is important to note the allowed tags part of the module. All of the tags shown in the textarea will be displayed in the output of the content item if they exist in the introtext.
As an example using the image above if you have an unordered list in the introtext of a content item it will be displayed int he slideshow because you have nominated it to appear. On the other hand images will not appear in the content area of the slideshow since the tag is not listed in the allowed tags text area.
Back to top
The slideshow navigation is an ordered list of triggers that are used to trigger a new slide. It is possible to hide the slideshow navigation entirely or display the navigation as numbers, coloured discs or as thumbnail images of the image in the slideshow. If you are using the thumbnail option then you need to make sure that the resize settings for the image thumbnails are set correctly.

Back to top
Here is a screenshot of the parameters available in the module as well as the settings required to replicate the display of the module on the front page.

What do you do if the images don't display and all you can see is the alt text.
There are a few reasons that this might occur and its best to troubleshoot using the web developer toolbar in firefox or image tools in Safari. Please check if you can do any of the following:
The images don't scroll, slide or fade they just sit there.
This either means that you do not have the JB LIbrary plugin installed and/or published or that you have the jQuery library loading more than once. jQuery run in no conflict mode is generally hassle free except if it is being displayed more than once on a page. If this is the case then you need to track down the component, module or plugin that is generating the extra jQuery reference and disable it.
In order for jQuery scripts to work in Joomla the jQuery library must be referenced after the default Joomla mootools library is called.
When I installed the slideshow everything else stopped working, or the images just display one on top of the other down the page.
These issues are most likely due to multiple instances of the jQuery library appearing on the page. Please see the explanation above.